Showing posts with label windows. Show all posts

Sunday, 5 April 2015

Resize Image without losing Quality – How to Guide

People hate to visit websites which require more time for loading. So one should always seek to improve the webpage load time, so to do so you have to look at many things like loading sources, page cache, media files etc. One among such media file is images, adding beauty to your page, but at the same time, it is regarded as the most bulky resources which takes much time to load on the page, thereby causing inconvenience to the visitors.

But one can improve the page load time by cutting the size of an image to a significant amount. But even resizing the image without any proper knowledge may be troublesome as you may lose the quality it had. Though photoshop provides a nice feature to save the original quality of the pic, it is not preferred much as it’s too expensive to purchase the photoshop application for desktop or web version. So here I’m going to provide you with free online tools to Resize Image without loosing Quality

Web Based Tools to Resize Image without losing Quality


1.Kraken.io :

JPEG, PNG, GIF, SIV are some of the image formats that can be compressed with this online application. This reduces the image to a quite considerable point without losing the image size.
This application is also available in Chrome and Firefox extensions

2.Imageoptimizer.net:

After uploading the image from your computer, give the size of the image and quality you wish to have after processing. This provides only some control of the output and compression ratio But Greatly Helps to Resize Image without loosing Quality.

3.Smush.it:

Smush.it is the best and popular online application you can have to compress images. It is present with an up-loader as well as URL box to have the image. In this you will not be provided with the ‘enter’ option to enter the image quality as that of previous one because it automatically optimizes the image by compressing it to a limit.

4.Compressjpg.com & Compresspng.com :

I would suggest you to have these application, for more control of the image quality. A slider appears as soon as you upload an image to auto control the quality of the last image. A preview panel is provided for showcasing the changes according to the quality slider change. So before downloading the image you can have the review of your final image. This application is available on different domains for JPG and PNG images.

5.Punypng.com :

This application is available to compress the PNG files. Upload an image and you can get a compressed size of the image. Besides this, tinypng.com , a quick tool to compress the PNG images to the best level without affecting the image quality.

Desktop tool to Resize Image without loosing Quality


If you need a Desktop tool to do this task then i would suggest you to have PNG Gauntlet as your first choice, You will need .Microsoft Net Framework 4.0 to run this tool on your Windows.
Resize Image without loosing Quality
You won’t Face any difficulty in Using this tool as it is very User Friendly. While Optimizing the images PNG Gauntlet will show you older size and Optimized size of the image. this Program is not that Fastest at it work but Usefull.
Read More »

Top 5 Websites to Improve typing Speed and skills

Everyone using the computer wish to finish their tasks quickly. For doing this, typing plays a vital role because no matter if you are making presentations, doing content writing or even chatting you have to apply your Typing skills everywhere.
It is dream of everyone to type rapidly and without even looking at your keyboard, just by concentrating on word over your screen which you are typing. But many of us really don’t have those great typing skills and if same is the case with you , just don’t worry .

Here is a list of few outstanding websites which will not only increase your typing speed but also let you Improve typing Speed and minimizing typing mistakes.

Top 5 websites to Improve typing Speed


1.TypingTest.com

Improve typing Speed
On Typingtest.com you will have to select a time slice ranging from 1 minute, 2 minutes and 3 minutes. Accordingly choose one text type from given ten types and then you can begin the touch typing test
After this test completes, website will generate a summary showing your typing speed, typing accuracy and errors that you made during your typing test. It will also categorize your typing in slow, Average or Fast in order to help you improve.
Besides, you can also play nine different games to test your typing speed while enjoying the game at the same time.

2.PowerTyping.com

Improve typing Speed
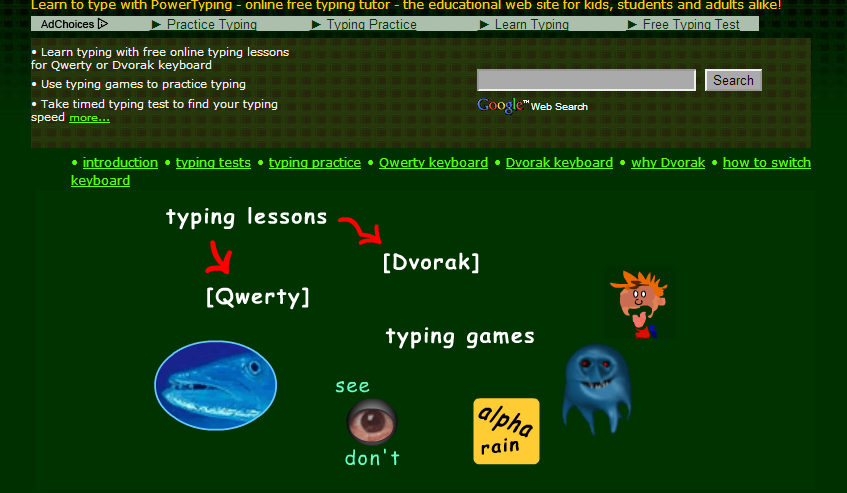
The website PowerTyping is an online free typing tutor website allowing you practice on both kinds of keyboards i.e. Qwerty keyboard and Dvorak keyboard. Here Qwerty keyboard will make your paragraph or words typing skills better while Dvorak keyboard will be helping you to understand the alphabet’s keys location on your keyboard. You can select your desired keyboard and take the typing practice, or you can play some typing games as well.

 3. Keybr.com

Improve typing Speed
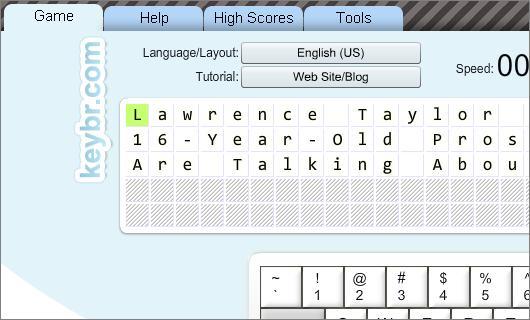
Keybr.com is different from above mentioned two websites in such a manner because besides English, you can also take test for French, Italian, German, Spanish, Portuguese and Russian here. Some of which offer more than one default keyboard layout making you perfect in typing languages even other than English.
You can choose the test type from Random words, Custom text and Imported web site or blog which gives you flexibility to practice simply anything you want.

4. TypeRacer.com

Improve typing Speed
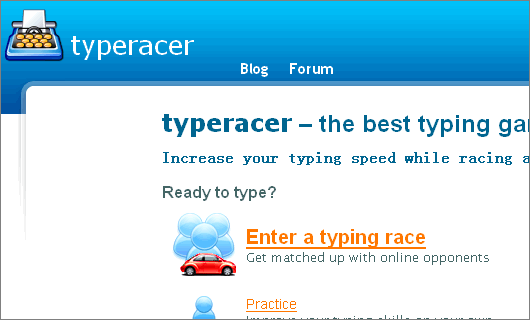
In TypeRacer.com you can enter a typing race, take some practices yourself and also invite your friends to a private race with chat where you can compete against them. It will not just Improve typing Speed of yours but will also help you to measuring typing speed as well as chatting with your friends at the same time. You can install TypeRacer on Facebook, Myspace, Orkut, Hi5, or Netlog  and you can also test your typing speed in Chinese, French, Japanese and many other languages.

5. FreeTypingGame.net

Improve typing Speed
As per the name of website, you can test and Improve typing Speed by playing games. There are 10 different free typing games and each of them has three levels: beginner, Intermediate and advanced.
Apart from this you can also study the typing lessons or you can take some typing tests if you don’t wish to play game and just want to practice in classical manner.
Keep on Practicing to Achieve your Goal, If you know any other Great Website, Feel Free to Mention it in Comments.
Read More »

Computer Security Tips to Protect your System information

We hear a lots and lots of concerning cases of hacking, softwares, malwares, viruses, etc, Here are someComputer Security tips to safeguard your PC/laptop against hacker intrusions, malware and different viruses that exploits your PC or Laptops.

6 Computer Security Tips


1) Use a firewall

A firewall is a software system that will handle outgoing and incoming Internet connections of your computer. You’ll be able to clearly use the one engineered into Windows by default, however this can be by no means the foremost Efficient. i will like to recommend Comodo Firewall which is free and straightforward to use. Using Firewall is just one of Computer Security tip that i want to mention

2) Use antivirus

There are obvious reasons to use Anti virus Programs, but there are People that don’t have any antivirus or those who have, they have not upgraded thier antivirus since their permit has lapsed.. However there are quite powerful free antivirus Available. One must Install Antivirus to Protect and Keep thier Computer Secure

3) Updating software system:

New vulnerabilities are found in software system or operative systems like Windows each day. So one must always updates thier software system. Keeping your installed Softwares upto date is Important, as it will Keep hackers away from breaking into your System and its Said that any upto date program Works smooth without any glitch.

4) Use complicated passwords

Users like you and me use too weak  passwords that are very simple to detect for hackers, there are so many software which will try all Possible Combinations to Crack your Password, this is known as Bruteforce technique .  If your secret word(password) Consists of just 4 or 5 characters, it will easily discover it.
Your Password becomes harder to crack if it consists of 8 or 9 characters which also includes numbers, letters and special characters.To check the strength of your Password, there are plenty tools over internet. This is an important Computer Security tip that everyone must Consider.

5) Use totally different passwords

Most common mistake people make is that they use same password everywhere over internet. Yes, its very hard to remember passwords for all accounts but its highly advisible to have different passwords for different accounts.
This Practice Comes handy if one of your account gets Compromised/Hacked, then your other accounts are still safe.

6) Always Beware:

  • Finally, Abstain from getting hacked,  Always beware while Browsing Internet, don’t transfer and install everything and anything on your PC or Laptop.
  • Always check the sources of software system and websites that you just use to download programs.
  • Don’t be silly and amateur hackers won’t be able to do  anything to you (while serious and skilled hackers will not have any interest to hack you)
Do you have any Computer Security tip that you will like to share ? Feel free to comment below.
Read More »

How to Check Original Installation Date of Windows

Many a times we want to know more and more about our System, What if a Friend of yours asks you some Questions about your PC and you fail to answer it, You may be Curious to Know the Original Installation Date of Windows. We all want to know when our windows was First Installed, How many months or Years have passed since you are chugging without Refreshing your System.

The Process to know the Original Installation Date of your Windows is Very Quick and Simple, Stay with me, read on and i will tell you how to do it Step by Step.

Steps to Check Original Installation Date of Windows


Step 1:  Hold Windows key and Press R key to open Run, Type CMD and hit enter to Open up Command Prompt.
Step 2: Type  systeminfo.exe  in Command Prompt and Hit Enter.
Step 3: Just wait a Few Seconds to Gather all the Data , Boom- You will Get all the info of your System in just a few seconds including the Original Installation Date which we are looking for.
Original Installation Date of Windows
Step 4: With this Command you Get all the Necessary info about your System but If you Just want to know the date on which your windows was Installed on your System then type this Command  systeminfo | find /i “install date
Original Installation Date of Windows
You can see its showing that i have installed my windows last month as i had to Refresh my Windows, its pretty much Accurate.
Thats it guys, in this tutorial we saw how to check our system info including the Windows Installation Date.
If you have any trouble related to this article, have a go and Speak your mind in Comment box. I will be more than happy to hear from You.
Read More »

Apps to Transfer Files between PC and Android

Do you transfer files by connecting your mobile phone to PC with the help of USB, thus connecting and disconnecting USB gives you trouble, so turn into wireless, thus reducing your tension of wire. The benefit of wireless is that it is easy to connect and there is fast transfer of files. Here are the few wireless apps which have highest reviews in Google Play store and that will help you to Transfer Files between PC and Android wirelessly


Apps to Transfer Files between PC and Android


Airdroid is an top app to Transfer Files between PC and Android. It is available at that size of 6.4 MB and requires Android 2.1 or up. It has the highest rating for wireless data transfer. It is easy to use and even looks much pretty. The Key feature supported by this app is that— desktop SMS service, wireless transfer of files and media data, phone locating technique app management, camera and screenshots.

Its size varies with devices. It is commonly known as an Android File Manager app but can also be used to transfer files wirelessly, select “Remote Manager” under the “Fast Access” list, you can find local network you are connecting to. Tap “Turn on”, find the given ftp address, then input the ftp address in the address bar of computer on your pc. As long as you get used to this app you will find it more than easy to use it.

It is available at the size of 2.8 MB and requires android 2.0 or up. It is not as easy to use. The first time you run this app, you are required to set service port and password for your connection. Tap “start server” an IP address is generated for your device, input The IP address and password on computer browser, there will be a page displayed which looks similar to desktop.
3CXDroid also supports USB mode, Desktop SMS, Gallery Viewer, Media Player, FTP Server, WiFi Keyboard, Webcam, Screen Capture, Contact Manager, Remote Call, Wallpaper Utils, APK Web Installer, Terminal Emulator, Logcat, etc.

 Conclusion :

With the help of such apps our work gets easier and better, and we don’t need the maximum use of USB or any other wiring, which make these apps unique and is greatly appreciated by the users. So what are you waiting for, don’t be in old fashion of wiring stuff just download the apps and enjoy life more easy.
Read More »

How to Remove Remove write protection in Pendrive ?

Whether it comes with software on it, or you’re just trying to use it for any other purpose, you should have the right to change things up however you like.
In this guide, you will be shown how to Remove Remove write protection in Pendrive and Memory Card. It’s a fairly simple process, so be sure to follow each and every step carefully. This guide is for information purposes and we are not responsible for anything that may happen to your device in the process.

Before we proceed, what is Write protection exactly? Write Protection is when the manufacturer locks the device down from being written on and prevents unauthorized access to add, change or delete the files on the device. While the uses of write protection is a good thing because it prevent files from being tampered with and the manufacturer can make sure all users are getting the same files, but it’s also very inconvenient. To remove this protection, to you will need to format the drive.
In this guide, I will show you exactly how to do that. Follow each and every step carefully, please. Windows platform is used for the purpose of this guide.

How to Remove Remove write protection in Pendrive ?


Step 1: Plug in your pendrive into your USB 2.0 on your computer. In order to make sure the computer has read your pendrive, you can go down to your bottom left on Windows, you will notice a small USB drive icon. If you click that, it will say “Removable Disk.” This means that the pendrive has been read successfully.  You can take a backup of your files from the pendrive or Memory card, Because we here are going to format it Completely.
Step 2: Next we need to open up command prompt. You can do this by simply going to “Start”, then just search for “Command Prompt”, or you can simply just type in “cmd” and command prompt should pop up.
Step 3: In the command prompt, type in the drive letter of your pen drive with a colon at the end, like this: “ F: ” but without the quotation marks.
Step 4: After putting in the previous command, type in “format” without the quotation marks. Here’s how to do it: “format F:” and then press “Enter.”
This should get the process started to Remove write protection in Pendrive. Make sure that you are entering the right command with the right drive letter. If you have more than one pen drive plugged in, make sure that you do select the right one as you can accidentally format the wrong drive, causing loss of data.
Step 5: After the process is complete, proceed to closing command prompt.
Congratulations! You’re successfully removed the Remove write protection in Pendrive.
If you have any questions or concerns, please write them in the comments section below. Let us know how we did and how things went for you.
Read More »

Trick to Access a Windows Desktop from Your SmartPhone or Tablet

Yes,you can Access a Windows Desktop from Your SmartPhone or Tablet. IPads and android tablets or Smartphone can’t run windows app locally, but with this you can remote your windows desktop, even with a physical keyboard. Many apps has been developed and launched like Microsoft remote desktop appTeamViewer for Remote Control, among which Microsoft app is mostly used for professional use while the other app can also be used for personal uses.


Microsoft’s remote desktop app 


This app has reduced the work load from one’s head of staying in the home and working all the day and cancelling the vacations and many more just because of the work info is available in your PC. With Microsoft remote desktop app, you can connect to your work resources and remote PC from anywhere you feel like working. This app is mostly used for business and professional use rather than the personal use.
Features of this app :
  • Access your desktop with your phones easily.
  • Rich multi-touch experience with remote desktop protocol (RDP).
  • It has an outstanding feature or technology, namely Network Layer Authentication which secure connection to your data and applications.
  • High quality video and sound streaming.
Review for this app :This app is friendly for the business related persons or for the professional use but not so friendly for the personal use.

TeamViewer for Remote Control


This app is friendly for the personal use too no matter wherever you are, rather than controlling your own computer you can also remotely troubleshoot your relatives PC.
Features : 
  • Access to computers (windows, Mac, Linux) is possible also during a telephone call.
  • Transfer the files from your PC to phone or from phone to PC.
  • Automatic quality adjustment.
  • Remotely reboot the computer.
  • TeamViewer free is for private use only e.g. to access or solve your or your friends computer problems.
All you have to do is Download an Install Teamviever on Your Desktop and Mobile, after installing on your smartphone you will have to login with the details that teamviewer window displays.

Other Options: Other than these two apps you surely have other options too if you are not friendly with both of them.
Splashtop: This is another popular remote desktop app that people reportedly has said that it is faster. But unfortunately this is not a free app as it may cost you around $20 at regular price. And to use it over internet you need to buy an additional “Anywhere access pack”. This app can be used or purchased if you don’t mind spending money or if you need a faster app to complete your work fast.

Conclusion: With the development of these apps both personal and professional works are carried out easily and in a better manner with easy access.
Read More »

Top 5 Free Media Players for Windows

Do you love listening to music? What if your phone does not support any music format? Its simple you get irritated right? So here is the answer for all your questions. Windows phones does not support video format like WMV3 and also third party with its own proprietary server software is needed to play videos. However this default can be recovered by simply downloading various media players that you wish to play videos on your windows phones in high quality.


So, if you want your windows phones to access all other video formats. The 5 best Media Players for Windows which will provide you with guaranteed results are as follows.

List of 5 Best  Media Players for Windows


1)VLC Media Player : VLC converts VLC video stream into a format that is supported by windows and can also play all broken files, there is no reason that it gives its users not to use VLC media player. According to developers it can also be used on Mac or Linux. It`s been used by more than 1k people, are you ready to join the best video experience as it can offer? Downloading it can reduce the daily struggle which you face with other media players.

2)Real Player : Real player is also known as Real One Player, it is a cross player created by Real Networks used to play recorded media. Real Player is compatible with number of formats like 3GP, MP3, MPEG-4, QuickTime and Windows media and has its own proprietary of RealAudio and Real Video formats. This software is available for both windows and windows phones and symbian version has been released.

3)FLV Video Player :  Plays FLV videos files from internet and from SD card if available. It has only five button interface which does not need a help file. To watch FLV video files from Youtube or from internet you need a special player, and this player has that specialty. It can play both audio and video files for you.

4)mPlayer : MPlayer is a popular media player that is both used for playing music and video on your windows phones. It gives a super fine experience of viewing video and with the HD quality of audio. The uniqueness of this media player is that it supports all types of video formats. It can also identify all types of flash videos. It has easy to use interface which is friendly to users. Hence, you will get simple option of locating file, adding a URL without impacting your device`s memory.

5)DivX Player : DivX player lets you watch movies on smart phones or windows phones. Many of you have dream of watching new movies in the bus but now it has became reality due to advancement in mobile technology. DivX player lets you enjoy movies wherever you go, on your windows phones. It helps you to watch AVI, DivX or MPEG movies in player window or you can even watch on full-screen mode. This app can automatically scan your device`s internal memory or SD card for compatible films. It comes with an unique feature that allows you to play around with sound tract.
Read More »

Common Uses of F1-F12 keys in Windows

You might be Using Windows since long time but i am sure majority of you guys don’t know all the features and Uses of F1-F12 keys on your keyboard. We all know Common shortcuts like CTRL+C to Copy and CTRL+V to Paste, But you might not know what F1, F2,F3…….F12 keys actually do and where and when to use them.
In this article we will see Common features and Uses of F1-F12 keys , and also how these keys can be used with the Combination of CTRL and ALT keys.


Various Uses of F1-F12 Keys in Windows


Uses of F1 key:

  • F1 key almost everywhere is used for “Help”.  if you are using windows OS and want help anywhere then press F1 key, this will open up help window for you.
  • Sometimes F1 key is used to enter the BIOS (press F1 when your computer is about to boot).
  • Combination of Win + F1 keys will open the “Help and Support» Microsoft Windows.

Uses of F2 key:

  • Rapidly rename the chosen file or folder. Works in all adaptations of Windows.
  • Alt + Ctrl + F2 – Opens the Document as a Microsoft Word.
  • Ctrl + F2 – Opens the Preview window in Microsoft Word.
  • Frequently to enter the BIOS.

Uses of F3 key:

  • In the MS-DOS charge line or in Windows, press F3 to rehash the last summon.
  • Win + F3 – Advanced Search window opens in Microsoft Outlook.
  • Shift + F3 – Changes the content in Microsoft Word, from upper to lower case or capital letters at the start of each one expression.
  • In the event that I am not mixed up it is the F3 key which will cause the Application«Control» computers Apple, running Mac OS X.

Uses of F4 key:

  • This opens the location bar, in the event that you press F4 in Windows Explorer and Internet Explorer.
  • Rehash the last activity (MS Word )
  • Ctrl + F4 – Closes the window open in the present window, for example, a tab in the program
  • Alt + F4 – Closes the system window in Windows.

Uses of F5 Key:

  • Refreshes the present page (works in all advanced programs), and additionally redesign the desktop or open organizers in Windows.
  • Running a slide demonstrate in Powerpoint.

Uses of F6 key:

  • Move the cursor in the location bar (additionally works in numerous advanced programs).
  • Ctrl + Shift + F6 – opens Document in Microsoft Word

Use of F7 key:

  • Mostly used for spelling and grammar in a document programs Microsoft (Word, Outlook, etc.)

Use of F8 key:

  • Pressing F8 key while your PC is about to boot will result into booting your PC in Safe mode.

Use of F9 key:

  • The F9 key does not have any functionality in Windows. It may, however be used in some individual programs. To find out if it is available in the program you are using, bring up the program’s help screen and type in the words function key.

Uses of F10 key:

  • Activates “Menu” in the open organizer window.
  • Shift + F10 – works same as the right mouse click.
  • Pressing F10 while your system is booting will show you BIOS Information.
  •  F10 is used to enter the hidden recovery partition on computers Sony.

Use of F11 key:

  • F11 Key will take you to Full screen mode and it can be used and work in any Browser.

Uses of F12 key:

  • Opens the “Save As” in Microsoft Word.
  • Shift + F12 – Saves a document in Microsoft Word.
  • Ctrl + Shift + F12 – Prints a document in Microsoft Word.
  • F12 key will open up Inspect element box in any Browser.
Fn + F1 or F2 or …. F12 keys will normally do the task that is Printed on the respective keys, This is basically for Laptop Users.
With this it Concludes my list of uses of F1-F12 keys in windows, if you know any more uses then please add to this article by Commenting Below.
Read More »